
A step by step guide to refinishing!
We recently received a message from one of our instagram followers with a request to guide them through refinishing a beautiful pair of nightstands that they have at home.
Let me say this - there are some people out there that believe that we should NOT share this information or show videos on how we do our work because doing so could mean that people will do this work themselves rather than hiring our business. To this, we roll our eyes.
Listen, there are literally billions of pieces of furniture in the world. 12 million TONS of it goes into landfills each year in the United States alone. Our business will never be big enough to repair and refinish all of this furniture and we see it as an extension of our values and our mission to help others do this work at home. Anytime someone wants to rehab a beautiful piece of furniture rather than buying from a big box store or an online retailer, we tip our hats and say hurrah.
While you can absolutely do this work at home, it will likely take your average DIYer two or three times as many hours to do the projects as it takes us in our shop. While we would work on your project over a week or two, you will probably need to work on it over several weeks or a month or two. Not only will we get better results that an DIYer will in our shop because we’re very good at what we do and we have professional tools, but it’s also significantly cheaper for us to do this work than someone doing it for the first time. For example, to do refinish the night stands in the photo below, we estimate that you will need to buy $150 - $250 in supplies and possibly some tools.
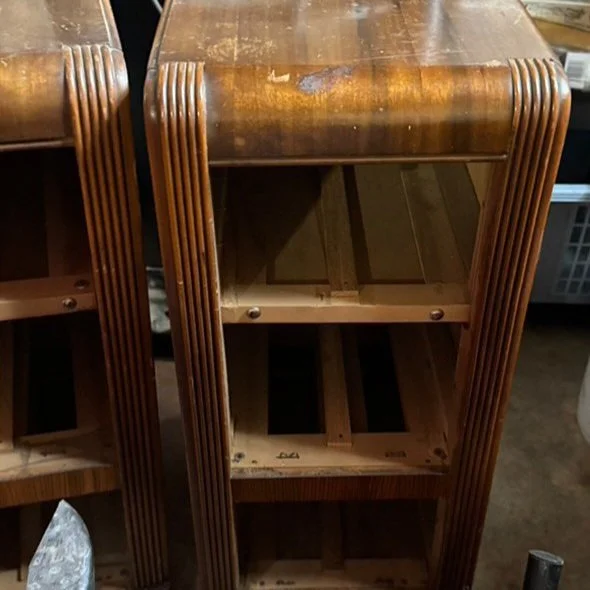
With all that aside, here’s our step by step guide to how to refinish this set of nightstands. Keep in mind that we’ve only seen this photo and don’t know all the details, so this is our best guess on what we would do.
How to Refinish Vintage Nightstands: A Step-by-Step Guide
Step 1: Preparing the Nightstands
Before diving into the refinishing process, start by thoroughly cleaning the nightstands.
Vacuum and wipe down the insides of drawers and cabinets.
Scrape off any residue or mystery gunk from the interior surfaces.
Remove hardware and clean out any buildup where the hardware was attached.
Pro Tip: Store hardware in a labeled ziplock bag to avoid losing any pieces.
As you clean, take note of any damage that may need repairs before refinishing.
Step 2: Repairing Damage
Before applying any finishes, ensure the nightstands are in solid structural condition. Common repairs may include:
Fixing loose drawer slides – Reglue or nail down slides inside the nightstand body or underneath drawers. Use a square to ensure proper alignment.
Securing drawer joints – If drawer corners are wobbly, apply wood glue and clamp them overnight.
Repairing loose veneer – Inject wood glue under peeling veneer using a syringe, then clamp overnight with plastic wrap between the veneer and the clamp to prevent sticking.
Checking for structural stability – Ensure the overall body of the nightstands is sturdy, addressing any weak spots before proceeding.
Step 3: Stripping the Old Finish
Stripping removes old finishes and helps preserve delicate veneer by minimizing excessive sanding.
Choose a stripper: Chemical strippers vary in strength. For a faster approach, use a traditional stripper from a hardware store (wear gloves and a mask). For a gentler, eco-friendly option, try GreenEZ or Stripwell QCS.
Apply the stripper evenly, then cover with plastic wrap to keep it from drying too quickly.
Scrape off softened finish with a putty knife, collecting residue in a disposable container.
Repeat as needed until most of the old finish is removed.
Use a toothbrush to clean out detailed areas and corners.
Patience in this step will make the next phases easier and yield better results.
Step 4: Sanding the Nightstands
Once the old finish is removed and the surface is dry, sanding smooths the wood and prepares it for staining or painting.
Be cautious with veneer – It can be thin, so avoid over-sanding.
Start with 120-grit sandpaper to remove residue and smooth the surface.
Follow with 150-grit sandpaper for a finer finish.
Final sanding: If staining, check manufacturer recommendations—some stains require sanding to 150 grit, others to 180 or 220 grit.
Clean with acetone after sanding to remove dust and debris.
Step 4.5: Repairing Veneer Chips
If you discover chipped veneer:
Use Mohawk wood epoxy putty in a matching color (available online or at hardware stores).
Fill holes, allow to set, and sand smooth.
Step 5: Staining the Nightstands
If you’re staining your nightstands, proper prep work ensures an even, professional-looking finish.
Choose a quality stain: We recommend General Finishes gel stains or any oil-based stain for consistent results.
Prep with mineral spirits or pre-stain conditioner (especially for oil-based stains).
Apply stain with a foam brush in small sections, then wipe off excess with a clean, lint-free cloth.
Safety Tip: Stain rags can spontaneously combust—dispose of them in a sealed metal container.
If you accidentally sanded through veneer, use Blend-All sticks to blend the color and disguise flaws.
Step 6: Sealing and Reassembling
Once your stain has dried for at least 24 hours, protect your work with a durable finish.
For durability: We recommend spraying at least three coats of polyurethane in our shop, but for DIYers, an oil-based wipe-on polyurethane works well.
Apply multiple coats, especially on the tops since nightstands endure heavy use.
Let dry completely, then reinstall hardware.
Final Step: Take a before-and-after photo to appreciate your hard work!
Final Thoughts
Refinishing vintage nightstands is a rewarding DIY project that breathes new life into old furniture. With patience and the right techniques, you can achieve a high-quality finish that enhances the natural beauty of the wood.
Have questions about refinishing? Drop them in the comments below!